

Like an artist restoring a masterpiece, you’re about to breathe new life into your hardwood floors. You’ll learn how to gather the right materials, prep your surface, grasp the floor buffing process and apply that knowledge with precision.
We’ll also cover adding the finishing touch and ensuring it dries correctly.
By the end, you’ll not only have rejuvenated floors but also a valuable new skill set to maintain their beauty.
Gathering The Necessary Materials
Before we get started, you’ll need to gather all the necessary materials for buffing your hardwood floors. This process isn’t as daunting as it may sound.
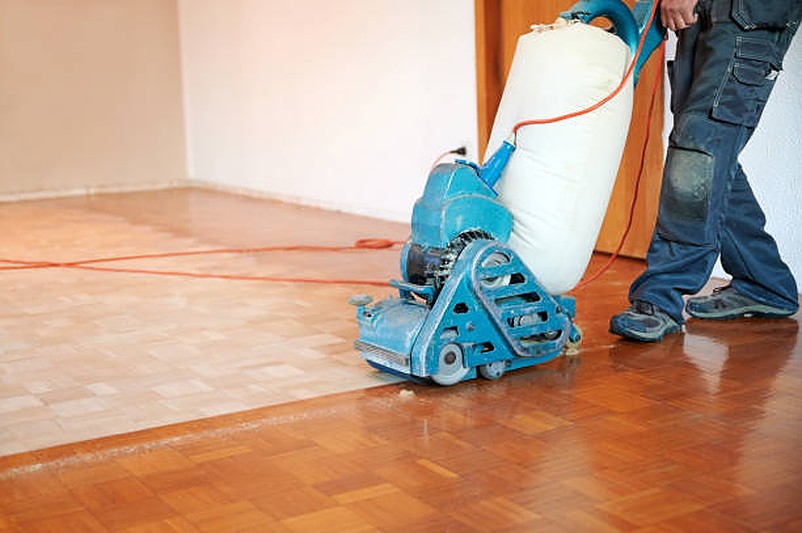
You’ll require a floor buffer, which is readily available at hardware stores or for rent from home improvement centers. With its high-speed rotating brushes, this machine will smooth out any rough spots and revive the sheen of your floors.
Next on your list should be a quality buffing pad that fits your machine. It’s essential to not skimp on this item; a superior pad ensures optimal results in floor buffing.
Lastly, grab a bottle of wood floor polish – it’s the final touch that brings back your hardwood floors’ original luster.
Now you’re ready for the innovative transformation ahead!
Preparing The Hardwood Floor Surface
You’ll need to clean the floor thoroughly, ensuring it’s free of dust and debris. Use a rug, high-quality broom, or vacuum for this initial sweep. Don’t underestimate this step; even minuscule particles can interfere with the buffing process, causing deep scratches on your newly polished hardwood floor.
Next, you’ll want to mop the floor using a specialized hardwood cleaner. This isn’t your typical mopping job – you’re aiming for a damp-clean that doesn’t leave excess water pooled on the wood. Remember, too much moisture can damage your precious flooring.
Lastly, let the floor dry completely before proceeding. It’s crucial not to rush this part; any residual dampness could lead to warping during buffing. Patience here reaps high rewards in preserving your floor’s integrity and shine.
Understanding The Buffing Process
Grasping the polishing process is essential because it’s not just about moving the machine around. It’s about technique and understanding what your floor needs.
You’ll need to assess your hardwood floor’s condition before deciding on the level of aggressiveness needed for buffing.
The choice of buffer pad is crucial. Different pads offer varying degrees of abrasion.
Understand that your movement matters. Systematically work in a pattern covering small sections at a time – don’t rush!
Lastly, remember to always vacuum or sweep after buffing to remove any dust particles.
Executing The Buffing Technique
Executing the polishing technique isn’t just about power, it’s also about finesse and understanding your machine. You’ve got to know how much pressure to apply, when to ease off, and how to move in a way that maximizes efficiency while minimizing potential damage.
You’re not just pushing the buffing machine around; you’re guiding it with purpose. The buffer is an extension of your will, breathing new life into worn-out wood floors. It’s crucial you maintain a steady pace, moving the machine back and forth in smooth, even strokes.
One pro tip: always keep the buffer moving. Letting it sit in one spot can cause over-buffing and damage the floor. Remember, perfection comes from precision – not speed or brute force.
Applying A New Coat Of Finish On Your Wood Floors
After all that buffing, it’s time to apply a fresh coat of finish to really make the surface shine. You’ll want to choose a high-quality, innovative floor finish product designed for hardwood floors.
Pour your selected finish into a painting tray and dip in your applicator. With precision, spread the finish evenly across the floor, following the grain of the wood. It’s crucial you don’t rush this part; finesse is key here.
Apply thin coats rather than one thick one – it’ll give you far superior results and allow for quicker drying times. Ensure every inch of your floor receives equal attention, achieving that seamless glossy look we’re aiming for.
Remember to leave ample drying time before walking on your newly finished masterpiece!
Ensuring Proper Drying And Curing
Moving on from the application of your new finish, let’s delve into the crucial aspect of ‘Ensuring Proper Drying and Curing.’
You’ve meticulously applied that fresh coat, but remember, it’s not just about putting it on — you must ensure it sets properly. The drying process is where innovation becomes paramount. Using cutting-edge techniques to expedite drying without compromising the finish quality is critical.
After applying your finish, maintain a room temperature of 70-75°F to facilitate optimal curing conditions and produce an effective protective layer. Resist the urge to speed up this process artificially as it might lead to an uneven or bubbled surface. Keep foot traffic minimal for at least 48 hours while avoiding furniture replacement for a week.
Trust in patience and precision here; they’re key players in achieving a stunning hardwood floor restoration outcome.
Maintaining The Restored Surface
Now that we’ve taken care of the drying and curing, it’s time to discuss how to maintain your beautifully restored surface.
Daily dusting is imperative to prevent grit from scratching your floor’s smooth finish. You’ll want to invest in a high-quality microfiber mop or cloth, which trap dust particles effectively.
Weekly cleaning with a pH-neutral wood cleaner keeps your floor looking its best without damaging the wood. Avoid using water or harsh cleaners as they can degrade the finish over time.
Finally, consider applying a fresh coat of finish every few years for extra protection. This innovative approach will ensure that your hardwood floors remain vibrant and resilient for many years to come.
Conclusion
Do not fret about the effort it’ll take to revive those tired, old floors. You’ve got this! With a little elbow grease and patience, your hardwood will gleam like new.
Remember, taking the time to refresh your floor not only enhances its beauty but increases its lifespan. You’re not just buffing a surface; you’re preserving memories for years to come.
So go ahead, roll up those sleeves and show that floor some love!